Can I install my purchases on multiple computers?
You can use your Prolost goodies on more than one machine, just not at the same time.
If you'd like to purchase multiple licenses of anything here, contact me and I'll make it easy.
You can use your Prolost goodies on more than one machine, just not at the same time.
If you'd like to purchase multiple licenses of anything here, contact me and I'll make it easy.
Importing an After Effects composition into Adobe Premiere Pro.
If you try to import an After Effects project that uses the Prolost Presets into Premiere Pro, you'll get an annoying error. Here's the fix, which also happens to be the super cool workfflow for using After Effects compositions in Premiere.
Because the Prolost Presets use expressions, which Premiere doesn’t support, you can’t import your Prolost Burns, Boardo, Speedramp, or Handcrank compositions into Premiere. But you can link them, using Adobe Dynamic Link.
The imported composition maintains a link to the After Effects project, so you can continue to make changes in After Effects, and they will update instantly in Premiere. But After Effects doesn’t have to be open when working with the imported composition in Premiere.
Dan Wilk of Adobe helpfully pointed out that you can drag an After Effects composition right into an open Premiere Pro project:
@5tu @prolost @AdobeAE @AdobePremiere simpler: avoid the dialog and drag and drop the comp between apps pic.twitter.com/7eXOy8KEp0
— Daniel Wilk (@DanielWilk) August 18, 2016
Prolost Boardo is designed to work with any kind of storyboard images. There are some presets and templates for iPad drawing apps I like, but you can easily use it with any storyboard images from any source.
When drawing storyboards, it's useful to have some extra room around the frame guide, so that you can draw a little more of the scene than is strictly covered by the camera. This gives you a little extra room to draw your shot, and the extra drawing comes in handy when creating camera moves with Boardo.
Since any storyboard template could have a different amount of extra room around the frame guide, Boardo allows you to set up scale and position offsets, so that at the default settings, your shots will be properly framed.
Configuring Boardo to work with a storyboard template is as simple as adjusting these offsets so that the image within the frame guide is properly framed in the After Effects comp. The following are step-by-step instructions for customizing Boardo to work with your own storyboard template.
Let's say you want to draw your storyboards in Photoshop using a Wacom Cintiq. You create a template that is, say, 2,000 pixels wide, and 1,500 pixels tall. Centered within that, you draw your frame guide — a 16:9 (or whichever aspect ratio is appropriate for your project) rectangle on its own layer, slightly smaller than the 2,000-pixel width of the document. You'll draw your storyboards underneath that layer, and export them without the guide.
Tip: It doesn't matter where you draw your storyboards, but central to the design of Boardo is that you draw them using a framing guide that doesn't export with the drawings. So either choose a layered drawing app like Photoshop or Sketchbook Pro, or an app with a built-in template/custom paper feature, such as Noteshelf.
You'll export your storyboard frames without the framing guide, but for setting up Boardo, you should export one image, at the same size as your storyboard frames, that includes the frame guide.
Import your template frame into After Effects and add it to a comp of the resolution you plan on using for your storyboards. See the User's Guide for a detailed list of recommended resolutions.
The layer will change position and scale, but probably won't line up correctly yet.
Do not touch any of the Start or End Pan, Tilt, or Zoom controls. Leave them at their defaults.
At the bottom of the Boardo controls, twirl open the Setup group. Here you'll find three controls: Scale Offset, Horizontal Offset, and Vertical Offset.
Use these to adjust the size and position of the layer, until the frame guide in your template lines up with the edges of the comp.
Tip: If your frame guide is centered, you can leave Horizontal Offset and Vertical Offset at zero. Scale Offset should be all you'll have to adjust.
Apply Boardo to all your shots. Copy the settings from the one you calibrated, and paste into the other shots.
That's it! Now all your shots are framed correctly, and you can start animating your board-o-matic.
Prolost Boardo is a set of Adobe After Effects presets that streamline the process of creating an animated storyboard, or board-o-matic. They work well with storyboards drawn in the Paper iPad app.
No template is necessary to draw storyboards in Paper. Just draw in the upper part of the landscape canvas, leaving the tools exposed.
Here's how Boardo will crop your Paper storyboards in a 16:9 composition.
Draw in portrait orientation to give yourself room for dramatic tilt-ups and tilt-downs.
In Boardo, use one of the Paper Setup Presets. Boardo will automatically crop your image to roughly what you see above right. If you draw with this margin in mind, you'll find that your Paper boards look great in Boardo — and you can always tweak the framing using the Setup controls.
You can also draw in portrait orientation, and use Boardo to pan around the vertical composition.

Draw a customizable arrow on any layer using three expressions-driven Line effects.
Use these Point Controls to set the start and end points for the arrow.
Turn this on and the arrow's position is controlled entirely by the Tip coordinates. Use End to set a relative end point that follows the tip. Great for tracking or animating the arrow position.
Controls the thickness and color of the lines used to draw the arrow.
Control the size and shape of the arrow head.

Easily animate a layer based on how many exact pixels you'd like it to move per frame. You set the starting position by manually moving the layer as usual. You can optionally force the layer Position and Anchor Point to snap to whole pixels.
How many pixels the layer will move in X (horizontally) on each frame.
How many pixels the layer will move in Y (vertically) on each frame. Positive values move the layer down.
Force the layer's Position to snap to whole pixels.
Force the layer's Anchor Point to snap to whole pixels.
When you pay using PayPal, you may see a scary message about pre-authorizing future payments. This is PayPal's confusingly-worded, but typical, way of working with online stores — in this case Gumroad, which powers the Prolost Store.
What it means is that if you choose to create a Gumroad account after your purchase, and choose to save your payment information in your Gumroad account, then the next time you buy something from Gumroad, you won't have to re-enter your PayPal login information.
The Prolost Store is powered by Gumroad. They accept credit cards and PayPal. Here's the complete list.
Sure. You can re-buy any item, including EDC, by following these instructions. Or just buy Stu a beer.

One of the most useful and powerful expressions in After Effects is wiggle(). It randomizes values according to a smooth Perlin noise function.
Prolost Wiggle Position is a handy preset that applies wiggle() to the Position parameter of a layer, and gives you easy control over the expression.
Controls the speed of the random motion, also known as the frequency of the noise. You can think of this as "wiggles per second."
Controls the size of the motion, in pixels.
Use Octaves to specify the complexity of the random motion. Higher values add more levels of smaller, detailed motion to the noise.
Seed controls the random seed used for the motion.
With Include Index in Seed off, the layer's random motion will be the same wherever you stack it. Turn it on and the wiggle will change when you re-sort the layer, which can be handy when applying the preset to multiple layers.

Apply this preset to a 2D layer. Choose a From Layer and a To Layer, and the layer will automatically be positioned, rotated, and optionally scaled to span between them.
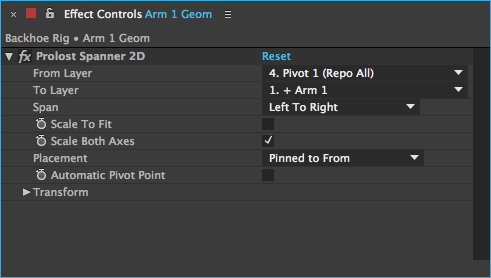
Choose any 2D layer in the composition other than the Spanner layer or the To Layer. It's OK if this layer is parented under others.
Choose any 2D layer in the composition other than the Spanner layer or the From Layer. It's OK if this layer is parented under others.
Sets the orientation of the aiming. Chose Left to Right and the layer's right edge will aim at the To Layer. Chose Top to Bottom and the layer's bottom edge will aim at the To Layer.
Toggle this on and the layer will scale automatically to fit between the To Layer and the From Layer. Works best if you also check Automatic Pivot Point.
If Scale to Fit is on, this setting determines if both X and Y axis are scaled, or just the one that corersponds with the Span setting.
Set this to Pinned to From and the position of the layer will match the From Layer. Set it to Centered, and the layer will be positioned in between the To Layer and the From Layer.
Turn this on and the Anchor Point of the layer will be adjusted automatically. Leave it off to use the layer's Anchor Point settings.
In this group, you have controls for adding a transform offset to the layer. You can adjust Position Offset (X and Y), Scale Offset, and Rotation Offset.
The Prolost Store runs on an e-commerce platform called Gumroad. According to Gumroad's help article on the subject, VAT regulations require digital marketplaces such as theirs to collect VAT. Gumroad is the entity with which you are doing business, so they are responsible for collecting VAT, not Prolost.
If you do not have to pay VAT, Gumroad says you may request a VAT credit directly from them.
If you used or created a Gumroad account when you downloaded your item(s) from the Prolost Store after August 12, 2015, you can easily re-download the latest version of any item from your Gumroad Library.
This happens sometimes, but not often. I’m sorry it happened to you! You were always my favorite.
If your PayPal payment failed, here are some things to try:
If none of that works, visit the Prolost Gumroad page. There you can buy using PayPal without any of the overlay code I use here.
If that doesn't work, contact me directly.

Ever since I was a little boy, I've wanted to draw so badly.
Prolost Boardo is a set of Adobe After Effects presets that streamline the process of creating an animated storyboard, or board-o-matic. They work well with storyboards drawn in the Noteshelf iPad app, using these Custom Paper templates.
To install the templates, first visit this page on your iPad. Go ahead, email yourself the link, like an animal.
Use Boardo-HD for standard 16:9 aspect ratio projects.

Use Boardo-Scope for cinematic 2.39:1 projects.
To learn how to export and animate storyboards created using these templates, consult the readme, or watch the video.
Saving the Custom Papers in Noteshelf.
Yeah, this is a bummer.
When you delete the preset from a layer, you're actually only deleting the "pseudo-effect" containing the sliders and other controls. Often, there are expressions on the layer that are linked to these controls. You delete the effect, the expression can't find the controls, so they throw errors.
Here are two ways to completely remove a preset from a layer in After Effects:
If you apply a preset and then undo it, you'll be right back where you started, with no expressions.
After deleting the preset effect, select the layer and press EE (press E twice in rapid succession) to reveal all properties with expressions.
On each one, click the = equals sign button to turn the expression off: ≠

Kinda. Here's one awesome example of how to do it.

If you’re using an older version of After Effects, such as CS6, you may see an error message when you apply the Prolost After Effects presets. This “missing effect” error does not harm your ability to use the presets. Just press OK to bypass the message, and use the presets normally. They’ll display in the Effects Control Pane as “Missing,” but there’s nothing wrong, and the presets will work perfectly.
You’ll also see the missing effect error when you re-open a project that uses the presets. The error is annoying, but harmless. Adobe has fixed this issue in recent versions of After Effects CC.
The Prolost After Effects presets should be copied to your User Presets folder. The location of this folder varies with your operating system and your After Effects version.
~/Documents/Adobe/After Effects <year>/User Presets/
Replace <year> with the CC version you have installed, e.g. After Effects 2023.
My Documents\Adobe\After Effects <year>\User Presets\
Replace <year> with the CC version you have installed, e.g. After Effects 2023.
